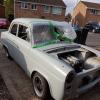
aaronblue Posted December 17, 2009 Report Posted December 17, 2009 Well after selling my nissan 200sx, i wanted to go back old skool so i have been searching for the past few weeks untill i saw this little beaut on ebay. after a week of waiting and getting the father in law to view it as im stuck at raf cosford i collected it saturday. as you al can see it needs a bit of tlc just a paint job mailny. the shell is solid no rust at all. as you can c from the pics it been fitted with a standard 2L pinto motor. and it runs so sweet. its got a fair few bits on 2.8 capri struts with billstein springs 105 anglia rear axle and well a lot more then i can remember lol. its going to be my road/drift/drag toy so i wont be going to mad with it lol. i will get some better pics up asap. hope you like cheers. cheers
lotusless Posted December 17, 2009 Report Posted December 17, 2009 nice one m8 good to hear you've dumped the jap crap
BaileyMex Posted December 17, 2009 Report Posted December 17, 2009 looking good mate that pinto looks like it was put in there at the factory
aaronblue Posted December 17, 2009 Author Report Posted December 17, 2009 yeah the job was done really well. i still cant get over how clean it is. just need to save my pennys now and get her all painted and slammed with some nice rimmage lol. i must give a HUGE thanks to Dave @ D&D Developments tho as he found the car and viewed it for me whilst i was training. cheers
Skoty Posted December 17, 2009 Report Posted December 17, 2009 i saw this on ebay, i was very tempted. she looks well good.
DAZZA Posted December 18, 2009 Report Posted December 18, 2009 .... aint doing it for me mate ........ wikid, another one on the road
aaronblue Posted August 30, 2011 Author Report Posted August 30, 2011 Hi Guys and Gals, i have been a busy chap sorry for the lack of updates but many things have been done since the last pics. Started off with fitting a dgas carb. After cleaning up the interia a tad change a few things. after running it around for a while with i got the itch for more power so i managed to get hold of one of these, A nice Kent FR32. Was a very good laugh for a few weeks but i couldnt help but want more power. so with a call to a very good friend and a week later, the motor now has a set of twin 40 carbs. Had a few issues with smooth ignition, so i managed to get hold of a Aldon igniter kit its made such a differance revs so smooth and freely. Now upto date with this week i now have this to fit tommorow. And last but no least i picked up these. after a week of sanding cleaning sanding and painting they now look like this. I couldnt be more pleased with the way they came out just need some good rubber. Few more plans lined up over the next few days starting with a home made anti tramp kit, and fitting some front lowering springs. I hope you guys like. Cheers Aaron
over_head_cam Posted August 30, 2011 Report Posted August 30, 2011 Sweet m8. You always know the quest for more go never ends I couldn't help but notice that the front wheels in the first pic seem to be FWD offset, is that going to be an issue with the new rims?
aaronblue Posted August 31, 2011 Author Report Posted August 31, 2011 I couldn't help but notice that the front wheels in the first pic seem to be FWD offset, is that going to be an issue with the new rims? Hi mate it was the only wheels that the chap had i belive so he used them but as soon as i got it home a set of mexico steels was fitted lol. its running capri struts so i should have no issues fitting the new wheels. (famous last words........)
aaronblue Posted August 31, 2011 Author Report Posted August 31, 2011 cheers fella, had a nightmare with the wheels today trying to clean them up and polish the lips but found some nasty dings filled with filler so i decided to just paint the whole wheel. not the look i was going for but they came out better then i thought. cheers for the comments tho peoples.
aaronblue Posted September 7, 2011 Author Report Posted September 7, 2011 Hi all i managed to get a bit more done over the last few days. the wheels have now been finished just waiting for some tyres to come up on ebay lol. Also now fitted the linkage kit. Next up was the cage, was pretty simple and straigh forwards tho and im really chuffed with the outcome. Just a few from outside. The motor is now running so sweet and goes like stink. The next plan is to get up to the hot rod drags and have some fun. cheers
aaronblue Posted January 28, 2012 Author Report Posted January 28, 2012 Got a fe more updates for you all. I finally got round to fitting the wheels and after a few weeks of driving it around and enjoying it i decided to sort th tramping out. So this week I was very busy with the back end of the car I started to make an Anti Tramp Kit and clean/ repaint the whole under of the car. so I got stuck in to making the setup based on this kit. After a bluepeter start with cardboard I finally got stuck into the 3mm steel. All tacked together. Then had a trial fitment. After spending a few hours under the car I decided to strip the axle,leafs, shocks etc... to clean and paint also want to paint the chassis and floorpan so the tools came back out. Had a slight issue with the leaf spring bolts. nothing an angle grinder cant fix. I now have all this to clean and paint. So after a few days of making the tramp kit and working out what I want to.M father in law put a 7" revolution under the arch with a few bricks JUST TO SEE WHAT IT LOOKS LIKE. And well thats when my whole plan went bye the waist side ;D. What do you think.
SteveL Posted January 28, 2012 Report Posted January 28, 2012 Will look good slammed ,But slightly bigger rims maybe?
aaronblue Posted January 29, 2012 Author Report Posted January 29, 2012 She will look amazing slammed, not sure about the rim size yet going to keep with the 13's if any issues we can move up a size.


Recommended Posts
Create an account or sign in to comment
You need to be a member in order to leave a comment
Create an account
Sign up for a new account in our community. It's easy!
Register a new accountSign in
Already have an account? Sign in here.
Sign In Now